Overview
Graphing In Groups can be used in a networked, collaborative mode, connecting up to 32 students into groups. To do so requires additional hardware and software as described below. The following figure shows how the different hardware and software components are related.
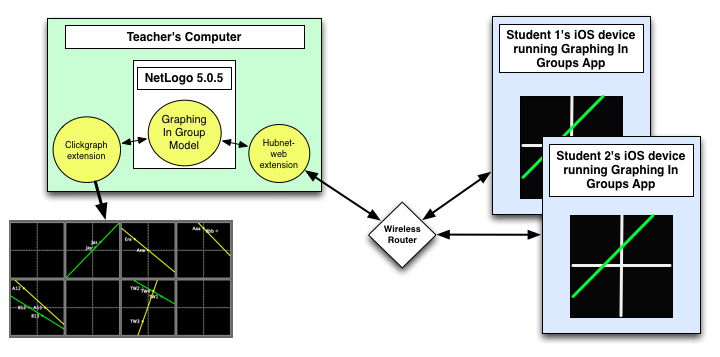
The hardware components include the teacher’s computer (green), student iOS devices (blue), and a wireless router (diamond shaped). On the teacher’s computer you will install NetLogo 5.0.5. Once NetLogo is installed, you will install the Graphing In Groups model and two extensions (clickgraph and hubnet-web), all identified by yellow circles, into directories under NetLogo. The clickgraph extension allows NetLogo to display a multi-graph window (lower left). The hubnet-web extension allow NetLogo and all the student iOS devices to communicate. You will need to install the iOS application (from the iTunes App Store) on each of the student iOS devices.
Required Hardware
To use in collaborative mode, one will need the following additional hardware items:
- A desktop or laptop computer (e.g. Macbook)
- A wireless network
- one iOS device for each student (e.g. iPad, iPod, etc.)
The desktop computer will be used to run a collaborative software package called NetLogo. NetLogo acts as a central hub to coordinate communication between students and display their collective results to the group. Each student will need their own iOS device. They will use their iOS device to run the Graphing In Groups application. The Graphing In Groups application will enable each student to connect to the teacher’s computer, form into groups, move their points around, etc. The Graphing In Groups iOS application should be loaded onto each iOS device.
Required Software
To use Graphing in Groups in collaborative mode you must obtain and install several software packages on the teacher’s desktop or laptop computer. Graphing in Groups uses the NetLogo modeling and collaboration application to coordinate all classroom activities. NetLogo can be obtained from the following location:
NetLogo is a general framework for modeling and collaboration, upon which the Graphing in Groups application is built. Custom applications are built by combining custom models and extension. To run Graphing In Groups in collaborative mode, you will need the Graphing In Groups NetLogo model and two additional extensions, one for graphing, and one for teacher/student networking. The model and both extensions can be downloaded as a single ZIP file:
Once you download and unzip the file, move the contents of the models folder to the models folder under the version of NetLogo you will be using. You should also move the contents of the extensions folder to the extensions folder under the version of NetLogo you will be using.
Using Collaborative Mode
The basics of Graphing In Groups is the same whether used in individual or collaborative mode. Basic instructions for using the application can be found in the Getting Started section. Below we describe the additional operations required to join a classroom network and use Graphing In Groups in a collaborative setting.
NetLogo Setup
Before using the Graphing in Groups clients, the teacher should have installed NetLogo on his/her computer and followed the setup instructions for using the Graphing In Groups model. Once NetLogo is running, the Graphing in Groups model has been loaded, and the Read Msgs button has been pressed, you are ready to connect iOS clients.
Server IP Address

When you first start the Graphing In Groups model it will open a small window titled HubNet Control Center. (If this window is covered or closed, it can be reopened from the Tools menu.) From the HubNet Control Center window, write the Server address on the board where all students can see it. In the example to the right, the server address is “169.237.97.12”.
NetLogo Settings
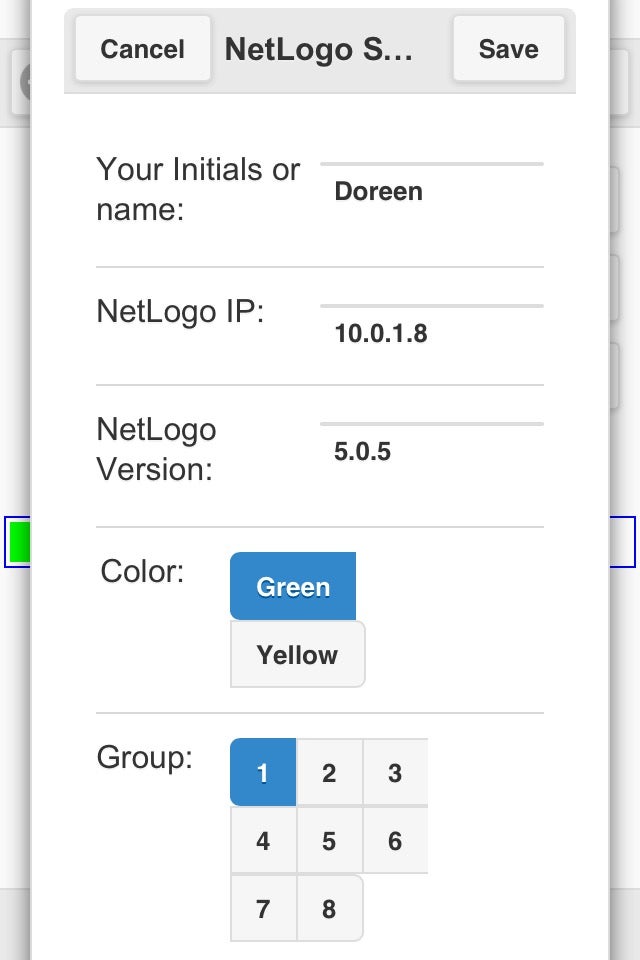
In order to connect each student to the classroom network they will each need to know five things:
- Name – a unique name or initials (defaults to the one entered on the Welcome screen)
- NetLogo IP – the Server address from the teacher’s HubNet Control Center
- NetLogo Version – the version of NetLogo that the teacher is using
- Color – green or yellow (must be the same for students working together to make a line
- Group – one of the 8 possible groups (up to 2 lines or 4 students per group)
Usually, groups and colors are assigned by tables, or by having the class count off.
In our example to the right, student Doreen will be joining Group 1, with color green. Her teacher got the number 10.0.1.8 from NetLogo’s HubNet Control Center. When all the values have been entered, tell students to press Save in the upper right.
Joining NetLogo

After the NetLogo settings have been saved, the graphing window will change slightly – displaying a new button to the right of the graph window, labeled Join. Students should click the Join button when they are ready. At this point, if everything has been configured correctly, the student’s name should appear on the teacher’s NetLogo window.
Entering Collaborative Mode
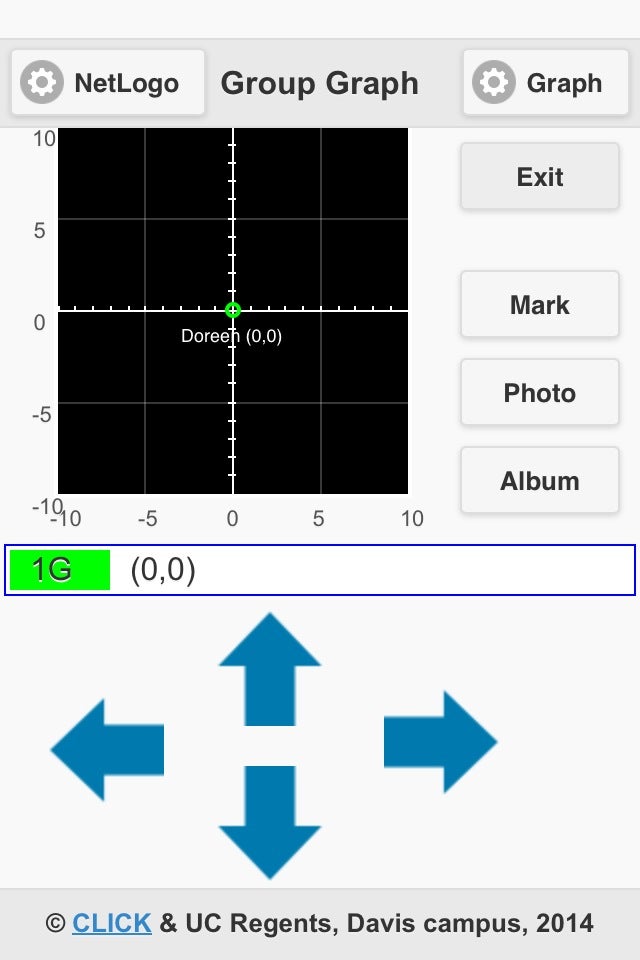
Once a student has successfully Joined NetLogo, their screen will change slightly. They will no longer have the ability to use a 2nd local Point A. The controls needed to switch between one’s own point and Point A will disappear. The point with their name will be repositioned to the origin of the graph (0,0). There will also be a new Exit button that will cause the student to disconnect from NetLogo. (Students should not use the Exit button unless instructed to do so.)
Working with a Partner

Once there are two student in the same group with the same color, then each student will see their own point as well as their partners. They are now free to move only their own point around the graph, forming lines as instructed. Additional commands covered in the Getting started section apply to collaborative mode.
Graphing In Groups Source Code
The model and extensions are also hosted in bitbucket GIT repositories.
The NetLogo model is in the following GIT repository.
To install the NetLogo model from the GIT repository follow these steps:
- Follow the above link to the model repository
- Select the Clone button on the left
- From the window that appears, copy the highlighted line (command)
- Open a terminal application on your computer
- Paste the command into the terminal window (git clone https://bitbucket.org/charlie_turner/graphing-in-groups-model.git)
- cd graphing-in-groups-model
- Copy the entire GraphingInGroups folder to the models folder of NetLogo
The Graphing in Groups model requires two custom NetLogo extensions. The following links will take you to different Bitbucket.org software repositories containing the source code to the extensions. Extensions are provided in two forms: compiled and source. The compiled extension is found in a ZIP file within the repository; it can be unzipped and copied “as is” into the extensions folder of NetLogo. The source code for the extensions is also contained within the repository; use of the source code is more involved; directions can be found on the repository README page. For each item, click on the link and follow the installation instructions on the respective sites.